Dental photography is now part of modern clinical documentation. Clear before-and-after images help dentists explain treatment needs, support cosmetic case acceptance, monitor orthodontic and periodontal changes, and communicate more accurately with labs.
For UAE clinics, the value is broader. Clinics need consistent records, clean workflows, reliable documentation, and efficient patient communication. A good dental photography system helps with:
- Smile design and cosmetic treatment planning
- Orthodontic progress tracking
- Implant, crown, veneer, and restorative case documentation
- Shade communication with labs
- Patient education and consent discussions
- Marketing-approved before-and-after case libraries
- Internal clinical audits
- Insurance and treatment record support
- Medico-legal documentation
However, inconsistent images can damage trust. If every dentist in the clinic uses a different phone, lighting source, angle, and file naming method, the images become hard to compare. A clinic-grade dental photography system should produce repeatable images across doctors, rooms, and branches.
That is why the best dental camera is the one your team can use consistently.
What Makes a Camera Good for Dental Photography?
A dental camera should produce sharp, color-accurate, repeatable images at close range. It should also be easy enough for associates, hygienists, nurses, and treatment coordinators to use after training.
1. Interchangeable Lens System
Avoid fixed-lens compact cameras for serious clinical photography. Dental photography needs a true macro lens, usually in the 90mm to 105mm range for full-frame bodies or around 60mm to 100mm for APS-C setups.
Mirrorless and DSLR systems allow you to attach dedicated macro lenses, twin flashes, ring flashes, and wireless triggers.
2. Macro Lens Compatibility
The lens matters more than the camera body. A true macro lens gives 1:1 magnification, sharp detail, low distortion, and proper working distance. For intraoral dentistry, working distance is important because the camera should not be too close to the patient’s mouth.
Recommended macro lens ranges:
- Canon: 100mm macro lens
- Sony: 90mm macro lens
- Nikon: 105mm macro lens
- APS-C systems: 60mm, 85mm, 90mm, or 100mm macro depending on mount and availability
Do not rely on a kit lens for clinical dental photography.
3. Flash System
Dental clinics need controlled light. Ambient operatory light is not enough. It varies by room, chair, window position, ceiling light, and time of day.
The two most common dental flash options are:
Ring flash: Easier for beginners, gives even light, useful for intraoral images. It can look flatter for portraits and anterior cosmetic work.
Twin flash: More flexible, better texture and contour, stronger for anterior esthetic cases, but needs more training.
For a clinic with multiple users, a ring flash is simpler. For cosmetic dentistry and high-end case presentation, twin flash is better.
4. Manual Mode and Custom Settings
A dental camera should allow saved custom settings. This matters because the clinic should not adjust exposure from scratch every time.
Typical starting settings:
- Mode: Manual
- Aperture: f/22 for intraoral, f/8–f/11 for portraits
- ISO: 100–200
- Shutter speed: 1/125 to 1/200
- White balance: Flash or custom grey card
- Focus: Manual or single-point autofocus depending on user skill
- File type: JPEG for routine workflow, RAW + JPEG for cosmetic/high-value cases
These are starting points, not universal rules. Your exact settings depend on the camera, lens, flash, room, and desired depth of field.
5. Ergonomics
A dental camera is used with gloves nearby, in small rooms, often between appointments. It should be light, fast to turn on, easy to hold, and not intimidating for staff.
A heavy full-frame setup can produce excellent images, but it may sit unused if the team finds it awkward. In many clinics, a mid-range APS-C mirrorless system is the better business decision.
Best Camera for Dental Photography in 2026: Top Choices
Best Overall for Most UAE Clinics: Canon EOS R50 or Canon EOS R10
Canon remains one of the most practical choices for dental clinics because of its color, usability, lens ecosystem, and staff-friendly interface. The Canon EOS R50 is compact and beginner-friendly. The Canon EOS R10 gives more control and better handling for clinics that want a slightly more advanced body.
Why it works for dentistry:
- Lightweight body
- Strong image quality
- Easy menus
- Good autofocus
- Practical for staff training
- Compatible with Canon RF lenses and adapted EF macro lenses
- Good value for clinics buying more than one unit
Recommended setup:
- Canon EOS R50 or R10 body
- Canon RF 100mm macro lens or adapted Canon EF 100mm macro lens
- Ring flash for general documentation
- Twin flash for cosmetic cases
- Intraoral mirrors, retractors, contrastors, grey card, and cheek retractors
Best for: General dental clinics, orthodontic clinics, cosmetic clinics, multi-doctor practices, and clinics buying their first proper dental photography kit.
Best Sony Setup: Sony a6400 or Sony a6700
Sony mirrorless cameras are compact, sharp, and strong in autofocus. The Sony a6400 remains a practical value option, while the Sony a6700 offers a newer APS-C body with stronger performance.
Sony’s 90mm macro lens is widely respected for sharp close-up work. This setup is especially useful for clinics that also want video content for patient education, social media, or treatment explanation.
Why it works for dentistry:
- Excellent autofocus
- Compact mirrorless bodies
- Sharp macro lens options
- Strong video features
- Good long-term lens ecosystem
Recommended setup:
- Sony a6400 or Sony a6700
- Sony FE 90mm f/2.8 Macro G OSS
- Ring flash or twin flash with compatible triggers
- Custom white balance workflow
Best for: Clinics that want photography plus video, cosmetic dentists, and teams already using Sony equipment.
Best Nikon Setup: Nikon Z50 II or Nikon Z5 II
Nikon remains strong for image quality and color, especially when paired with a good macro lens. The Nikon Z50 II is a practical APS-C option, while the Nikon Z5 II gives clinics a full-frame path without jumping into the highest price tier.
Why it works for dentistry:
- Strong image quality
- Good ergonomics
- Reliable color
- Solid lens options
- Good full-frame upgrade path
Recommended setup:
- Nikon Z50 II for APS-C value
- Nikon Z5 II for full-frame value
- Nikon 105mm macro lens
- Ring flash or twin flash system with compatible adapter
Best for: Clinics that prefer Nikon handling, existing Nikon users, and practices that want strong still-image quality.
Best Premium Setup: Sony A7 IV, Canon EOS R6 Mark II, or Nikon Z6 III
Premium full-frame cameras are not necessary for every dental clinic, but they make sense for practices focused on cosmetic dentistry, implantology, prosthodontics, high-end marketing, or educational content.
Full-frame cameras give excellent image quality, better dynamic range, and stronger low-light performance. The downside is higher cost, heavier lenses, and more complex setup.
Recommended premium setups:
- Sony A7 IV + Sony 90mm macro
- Canon EOS R6 Mark II + Canon RF 100mm macro
- Nikon Z6 III + Nikon 105mm macro
Best for: Cosmetic clinics, dental academies, premium case documentation, lecture content, social media-heavy practices, and clinics with a trained photography lead.
Best Budget Setup: Entry-Level Mirrorless Body + True Macro Lens
A clinic with a limited budget should avoid spending most of the budget on the camera body. Buy a lower-cost body, then invest in the lens and flash.
A budget kit should still include:
- Interchangeable lens camera body
- True macro lens
- Ring flash
- Intraoral mirrors
- Cheek retractors
- Contrastors
- SD cards
- Batteries
- Cleaning kit
- Standard operating procedure for staff
A cheap camera with a proper macro lens and flash is better than an expensive camera with a kit lens and no flash.
DSLR vs Mirrorless for Dental Photography
Should UAE Clinics Still Buy DSLR Cameras in 2026?
DSLR cameras can still produce excellent dental images. A Canon 90D, Nikon D7500, Canon 80D, or Nikon D750 with a good macro lens and flash can still serve a clinic well.
However, if buying new in 2026, mirrorless is usually the better direction. Mirrorless systems are lighter, newer, easier to preview exposure, and more future-proof. Manufacturers are also focusing new lens development on mirrorless mounts.
When DSLR Still Makes Sense
A DSLR can still be a good decision if:
- Your clinic already owns DSLR bodies
- You already have compatible macro lenses and flashes
- Your staff is trained on DSLR workflow
- You can buy used equipment from a reliable supplier
- You need a lower-cost second setup
When Mirrorless Is Better
Mirrorless is better if:
- You are buying a new kit from scratch
- You want a compact setup
- You want better video capability
- You want longer-term equipment support
- You plan to standardize across multiple branches
For most UAE clinics buying in 2026, mirrorless is the safer default.
APS-C vs Full Frame: Which Sensor Is Better for Dentistry?
Full frame is not automatically better for dental photography. APS-C cameras are often excellent for clinics because they are lighter, cheaper, and provide effective extra reach due to crop factor.
APS-C Advantages
- Lower cost
- Smaller body
- Lighter kit
- Easier for staff
- Good magnification for intraoral images
- Better value for multi-room clinics
Full-Frame Advantages
- Higher image quality ceiling
- Better dynamic range
- Better portrait and marketing image quality
- More premium lens options
- Stronger for clinics producing educational or advertising content
Practical Recommendation
For 80% of UAE clinics, APS-C mirrorless is enough. For clinics doing high-end cosmetic dentistry, dental education, premium smile makeovers, or heavy marketing, full frame is worth considering.
Best Lens for Dental Photography
The best lens for dental photography is a true macro lens. The body captures the image, but the lens determines the detail, distortion, working distance, and sharpness.
Recommended Macro Lens Focal Lengths
For full-frame cameras:
90mm, 100mm, or 105mm macro lenses are ideal.
For APS-C cameras:
60mm to 100mm macro lenses can work, but many dentists still prefer 90mm or 100mm for better working distance.
Why 90–105mm Works So Well
This range gives enough space between the camera and patient while still capturing fine detail. It also reduces distortion compared with shorter focal lengths. For anterior cosmetic shots, this helps preserve natural tooth proportions.
Avoid These Lens Mistakes
- Do not use a basic 18–55mm kit lens for intraoral documentation
- Do not buy a “macro” zoom lens unless it is a true clinical macro option
- Do not prioritize wide aperture over macro capability
- Do not assume image stabilization replaces flash
- Do not buy a lens before confirming camera mount compatibility
Best Flash for Dental Photography
Lighting is the most common reason dental photos fail. A good camera without flash gives inconsistent results.
Ring Flash
A ring flash surrounds the lens and produces direct, even light. It is simple, fast, and useful for intraoral documentation.
Pros:
- Easy to train staff
- Consistent intraoral images
- Good for posterior shots
- Lower learning curve
Cons:
- Can look flat
- Less texture and depth
- Less ideal for premium anterior cosmetic shots
Twin Flash
A twin flash uses two adjustable flash heads positioned on either side of the lens.
Pros:
- Better texture
- Better shadow control
- Better for anterior esthetics
- More professional case presentation
Cons:
- More expensive
- Requires more training
- Easier to create inconsistent lighting if staff are untrained
Practical Flash Recommendation
Use ring flash for general clinical documentation. Use twin flash for cosmetic dentistry, shade communication, anterior esthetic work, and premium case photography.
Complete Dental Photography Kit Checklist
A clinic should buy the full workflow, not just the camera.
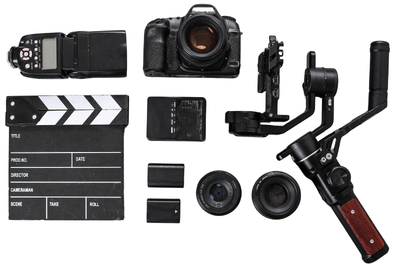
Camera Equipment
- Mirrorless or DSLR camera body
- True macro lens
- Ring flash or twin flash
- Flash brackets or adapters
- Extra batteries
- High-quality SD cards
- Battery charger
- Protective camera bag
- Lens cleaning kit
Dental Accessories
- Intraoral mirrors
- Buccal mirrors
- Occlusal mirrors
- Cheek retractors
- Contrasts or black backgrounds
- Grey card or color calibration card
- Disposable barriers where needed
- Mirror warmer or anti-fog method
Workflow Tools
- Naming convention
- Image upload protocol
- Consent workflow
- EMR attachment process
- Storage policy
- Backup process
- Staff training checklist
- Standard operating procedure
Dental Photography and EMR: The Workflow Clinics Forget
Many clinics buy a camera but ignore what happens after the photo is taken. This creates the real problem.
Photos end up in:
- Personal phones
- WhatsApp chats
- Random desktop folders
- Camera SD cards
- Unnamed cloud folders
- Marketing folders with no clinical link
- Patient files with no standard order
This is risky and inefficient. Dental photos should be connected to the patient record, visit date, treatment plan, consent status, and clinical notes.
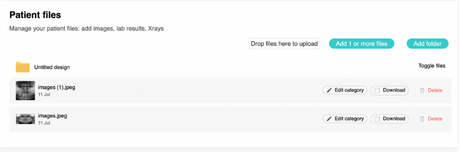
A better workflow is:
- Take standardized clinical images.
- Transfer images to a secure clinic device or approved system.
- Rename or classify images by patient, date, and treatment category.
- Attach images to the correct patient file.
- Add relevant clinical notes.
- Use images for case discussion, treatment planning, or follow-up comparison.
- Keep patient consent clear before marketing use.
This is where clinic management software matters. Balsam Medico is built for UAE clinics that need EMR, scheduling, billing, eClaimLink, NABIDH/Riayati workflows, reporting, and structured documentation.
Learn more about Balsam Medico features: https://balsammedico.com/features
UAE Clinic Buying Considerations
1. Local Warranty and Supplier Support
Do not buy grey-market camera equipment unless the price difference is significant and the clinic accepts the risk. UAE clinics should prioritize:
- Local warranty
- Available service center
- Original charger and batteries
- Genuine lens
- Return policy
- VAT invoice
- Supplier reputation
For clinic purchases, a proper invoice matters for accounting and asset tracking.
2. Multi-Branch Standardization
If your clinic has multiple branches, do not let each branch buy different equipment. Standardize one or two approved kits.
Standardization helps with:
- Staff training
- Replacement parts
- Settings templates
- Image consistency
- Procurement
- Troubleshooting
- Brand consistency
3. Staff Training
A camera kit is useless if only one dentist knows how to use it. Train the full clinical team on:
- Camera handling
- Patient positioning
- Mirror positioning
- Retractor placement
- Intraoral photo sequence
- Portrait photo sequence
- File transfer
- EMR upload
- Consent rules
- Cleaning and storage
4. Consent and Marketing Use
Clinical documentation and marketing use are not the same. A patient’s clinical photo should not automatically become Instagram content.
Before using photos for marketing, get explicit consent and define the scope of use. Cosmetic clinics should have a clear before-and-after photography policy.
5. Data Security
Dental images are patient data. Clinics should treat them as part of the medical record. Avoid uncontrolled storage in personal devices or informal messaging apps.
Recommended Dental Photography Setups by Clinic Type
General Dental Clinic
Recommended setup: Canon EOS R50 or R10 + 100mm macro + ring flash
Why: Simple, cost-effective, easy to train, strong for routine documentation.
Use cases: Caries, restorations, hygiene, pre-op/post-op, patient education.
Orthodontic Clinic
Recommended setup: Canon EOS R10, Sony a6400, or Nikon Z50 II + macro lens + ring flash
Why: Orthodontics needs repeatable image sequences over time. Consistency matters more than premium full-frame quality.
Use cases: Initial records, aligner progress, braces monitoring, retention documentation.
Cosmetic Dental Clinic
Recommended setup: Sony A7 IV, Canon EOS R6 Mark II, or Nikon Z5 II/Z6 III + 90–105mm macro + twin flash
Why: Cosmetic dentistry benefits from higher-quality portrait, shade, texture, and smile design images.
Use cases: Veneers, whitening, smile makeovers, composite bonding, before-and-after marketing.
Multi-Branch Dental Group
Recommended setup: Standardized APS-C mirrorless kits across branches
Why: Easier training, lower cost, consistent images, simpler support.
Use cases: Documentation, audits, marketing library, cross-branch case review.
Training Center or Dental Academy
Recommended setup: Full-frame camera + macro lens + twin flash + video-capable body
Why: Teaching requires high-resolution images, video output, and consistent demonstration quality.
Use cases: Courses, lectures, clinical demos, online education, case libraries.

Dental Photography Settings: Simple Starting Point
Every camera system is different, but these starting points work for many clinics.
Intraoral Photos
- Mode: Manual
- Aperture: f/22
- ISO: 100
- Shutter: 1/125 or 1/160
- Flash: Manual or TTL depending on consistency
- Lens: Macro
- Focus: Manual or single-point autofocus
- White balance: Flash or custom
Extraoral Portraits
- Mode: Manual
- Aperture: f/8 to f/11
- ISO: 100–200
- Shutter: 1/125
- Flash: Softened or adjusted
- Background: Plain, clean, repeatable
- Distance: Standardized
Smile Photos
- Mode: Manual
- Aperture: f/11 to f/16
- ISO: 100
- Shutter: 1/125
- Flash: Twin flash preferred for esthetic texture
- Framing: Standardized crop
Document these settings and keep them near the camera station. Do not rely on memory.
Common Mistakes When Buying a Dental Camera
Mistake 1: Buying the Most Expensive Body First
A premium body with the wrong lens and no flash will fail. Spend first on macro lens and lighting.
Mistake 2: Using Smartphones for Everything
Smartphones are convenient, but they are not ideal for standardized clinical photography. They can distort proportions, change colors automatically, and create inconsistent lighting. They may be useful for quick communication, but a dedicated camera is better for clinical records.
Mistake 3: No Standard Photo Protocol
Without a protocol, photos are impossible to compare. Create a fixed sequence:
- Full face at rest
- Full smile
- Right profile
- Left profile
- Retracted frontal
- Retracted right buccal
- Retracted left buccal
- Upper occlusal
- Lower occlusal
- Close-up anterior smile where needed
Mistake 4: No EMR Upload Process
Photos should not stay on the camera card. Create a daily upload routine.
Mistake 5: No Consent Policy
Marketing photos require separate consent. Do not blur this line.
Final Recommendation
The best camera for dental photography in 2026 depends on your clinic type, budget, and workflow maturity.
For most UAE clinics, choose a Canon EOS R50 or Canon EOS R10 with a true macro lens and ring flash. This gives the best balance of image quality, usability, cost, and training simplicity.
For Sony users, the Sony a6400 or a6700 with a 90mm macro lens is a strong photography and video setup. For Nikon users, the Nikon Z50 II or Z5 II with a 105mm macro lens is a reliable choice.
For premium cosmetic clinics, a full-frame setup with a 90–105mm macro lens and twin flash is worth the investment.
But the camera is not the whole system. The real value comes when your clinic standardizes the full workflow: photo sequence, consent, file naming, EMR upload, clinical notes, treatment planning, and follow-up comparison.
A good dental photography setup captures the image. A good clinic management workflow makes that image useful.
Connect with Us
Ready to embark on this exciting journey? Contact us today:
📍 Dubai, United Arab Emirates – Tel: +971 56 640 9602
📍 Khartoum, Sudan – Tel: +249 91 273 1048
Explore Balsam Medico and discover a world of efficient clinic management at www.balsammedico.com. Together, let’s reduce fines, elevate efficiency, and embrace a new era of dental healthcare.
One last thing..
PS: We built Balsam Medico to be the best software for clinics in UAE and the middle east. It is powerful, flexible, and most importantly, very easy to use.
If you have two minutes, see how it works.
This is the main landing page to learn more.